SpringBoot 整合 Swagger
Java Doc
常用的标签
参考资料 Swagger使用和注释介绍
下面记录常用的标签 类:
@author@version@param形参名 对参数的描述@deprecated表示这个类已经过时
方法
@return@param形参名 对参数的描述@throws或@exception@deprecated表示这个方法已经过时
例子:
/**
* <b>这是对这个方法的描述</b><br/>
* 这是对这个方法的描述<br/>
* 这是对这个方法的描述<br/>
* 这是对这个方法的描述<br/>
* 这是对这个方法的描述<br/>
*
* @param a 输入一个StringBuffer用来测试
* @param b 输入一个String用来测试2
* @return String
* @throws Exception 返回一个空值错误
* @author alsritter
*/
public String test(StringBuffer a, String b) throws Exception {
    if (a == null) {
        throw new Exception();
    }
    return "hello";
}
注意:描述方法的直接放在开头就可以了
<br/>
<p>表示一整段文字的描述,没有换行</p>
<b>表示文字用粗黑体</b>
{@code 这里是代码}表示在注释插入代码,例如List<String>里面的<>就不会被识别为一个 HTML 标签
@link 和 @see 的使用
写代码的时候可能要写一些注释,把内容相互关联起来,以便直接定位到某个代码类或者啥的。
@see 标签允许用户引用其他类的文档。具体使用方式如下:
/**
 * 注解必须在行首,且每个 @see 会用逗号隔开
 *
 * @see classname
 * @see fully-qualified-classname
 * @see fully-qualified-classname#方法名称(不用加括号)
 * @see fully-qualified-classname#属性名称
 *
 * 例如
 * @see com.alsritter.entity.MyTestClass#test
 */
@link 标签作用是链接到另一个地方,与 @see 用途基本相同,但是使用时不需要在行首,且要用 { } 包围
/**
 * {@link com.alsritter.entity.MyTestClass#test}
 * 如下
 */


/**
 * Returns a stream of code point values from this sequence.  Any surrogate
 * pairs encountered in the sequence are combined as if by {@linkplain
 * Character#toCodePoint Character.toCodePoint} and the result is passed
 * to the stream. Any other code units, including ordinary BMP characters,
 * unpaired surrogates, and undefined code units, are zero-extended to
 * {@code int} values which are then passed to the stream.
 *
 * <p>If the sequence is mutated while the stream is being read, the result
 * is undefined.
 *
 * @return an IntStream of Unicode code points from this sequence
 * @since 1.8
 */
编码问题
用 IDEA 生成 Java Doc 时,在 Tools --> Gerenate JavaDoc 面版的 Other command line arguments 栏里输入:-encoding utf-8 -charset utf-8
Swagger
参考资料 官方文档 参考资料 Spring Boot 2.x基础教程:使用SpringFox 3生成Swagger文档
Swagger2 是一款开源的文档生成器,它可以构建一份 RESTful API 文档来描述所有的接口信息
生产环境中,要关闭 swagger
springfox:
  documentation:
    enabled: false
当我们在使用 Spring MVC 写接口的时候,为了生成 API文档,为了方便整合 Swagger,都是用这个 SpringFox的这套封装
配置环境
果然不应该第一时间就去看各种教程而是应该直接翻官网,官方实际已经删除 springfox-swagger2 springfox-swagger-ui 使用方法和以前也不同,例如已经删除了 @EnableSwagger2
<!-- 使用官方的远程库,好像要挂梯子 -->
<repositories>
    <repository>
        <id>jcenter-snapshots</id>
        <name>jcenter</name>
        <url>https://jcenter.bintray.com/</url>
    </repository>
</repositories>

<!-- 使用全新的依赖 -->
<!-- 只需导入这个 starter -->
<dependency>
     <groupId>io.springfox</groupId>
     <artifactId>springfox-boot-starter</artifactId>
     <version>3.0.0</version>
</dependency>
然后只需在启动类上加上一个 @EnableOpenApi 注解
@SpringBootApplication
@EnableOpenApi
public class StudyswaggerApplication {
    public static void main(String[] args) {
        SpringApplication.run(StudyswaggerApplication.class, args);
    }
}
然后就可以直接访问
http://localhost:8080/swagger-ui/
注意:如果用到了 Spring Security 别忘了加上白名单
String[] SWAGGER_WHITELIST = {
        "/swagger-ui.html",
        "/swagger-ui/*",
        "/swagger-resources/**",
        "/v2/api-docs",
        "/v3/api-docs",
        "/webjars/**"
};

httpSecurity.cors()
        .antMatchers(SWAGGER_WHITELIST).permitAll()
常用的注解
更多注解的配置细节参考 swagger2 注解说明
@Api:用在 controller 类,描述 API 接口@ApiOperation:描述接口方法@ApiModel:描述对象@ApiModelProperty:描述对象属性@ApiImplicitParams:描述接口参数@ApiResponses:描述接口响应@ApiIgnore:忽略接口方法
配置 Docket
参考配置 SpringBoot整合Springfox-Swagger2
Swagger 实例 Bean 是 Docket,所以必须通过配置 Docket 实例来配置 Swagger
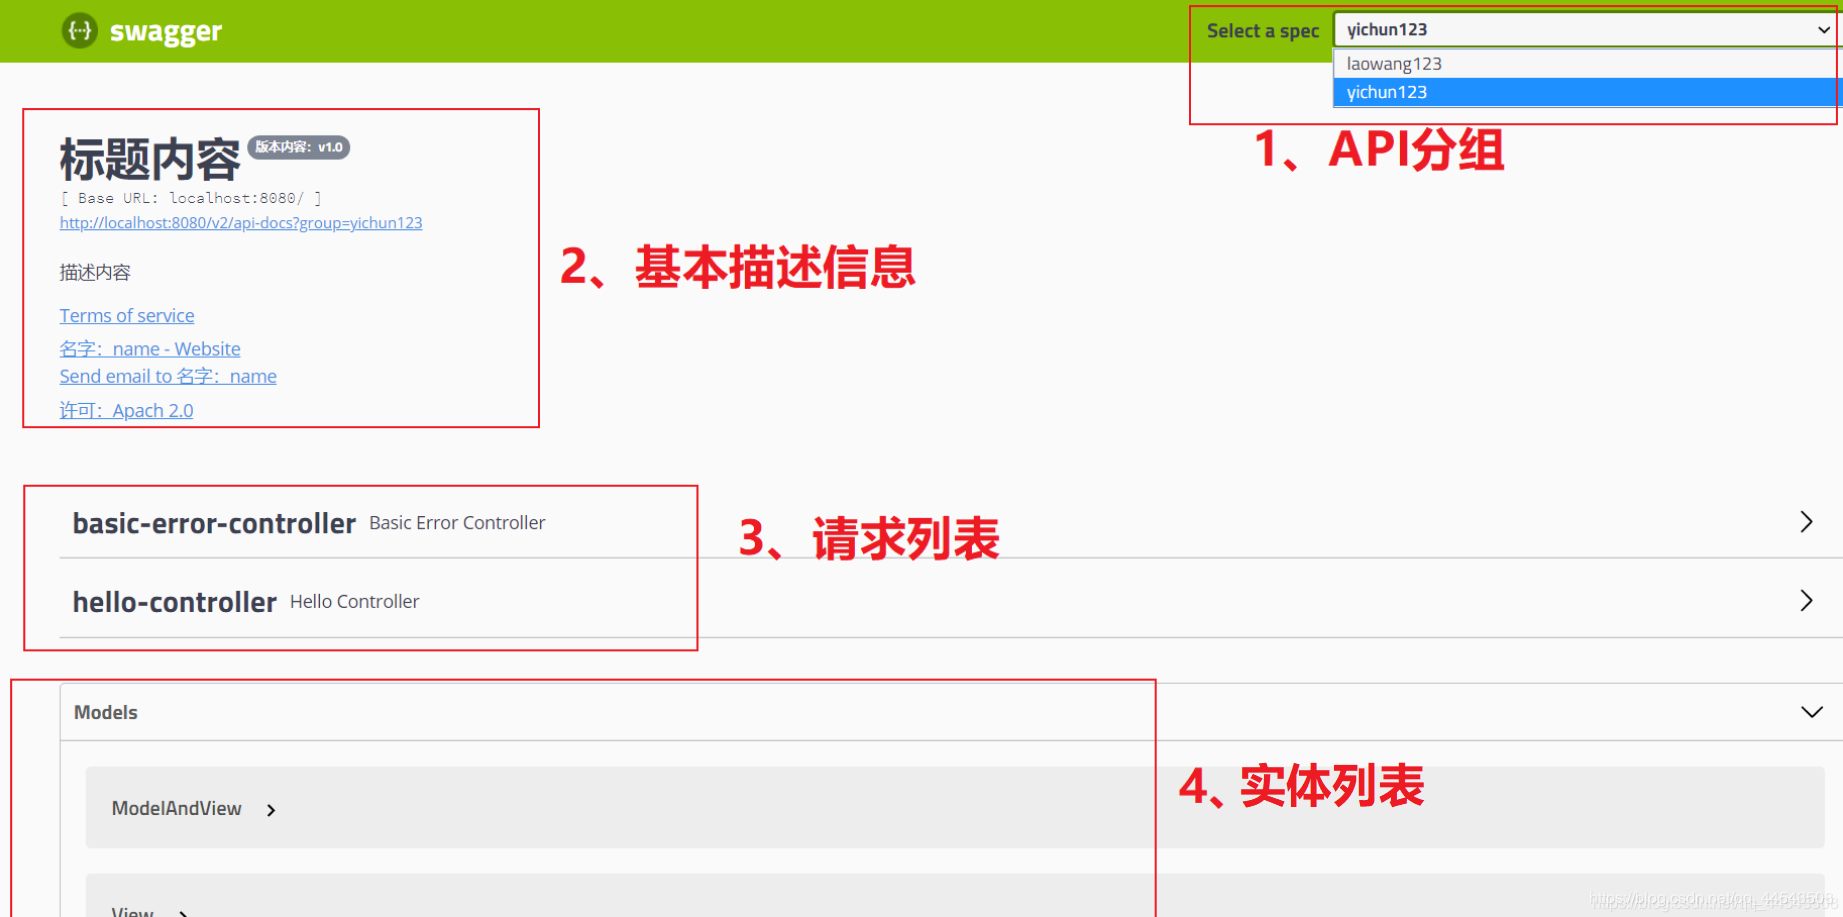
第一部分:API分组:如果没有配置分组默认是 default。通过 Swagger 实例 Docket 的 groupName() 方法即可配置分组
第二部分:基本描述:可以通过 Swagger 实例 Docket 的 apiInfo() 方法中的 ApiInfo 实例参数配置文档信息
第三部分:请求接口列表:在组范围内,只要被 Swagger2 扫描匹配到的请求都会在这里出现。
第四部分:实体列表:只要实体在请求接口的返回值上(即使是泛型),都能映射到实体项中!
@Configuration
@ComponentScan("com.example.controller")
public class SwaggerConfig {
    @Bean
    public Docket docker(){
        // 构造函数传入初始化规范,这是 swagger2 规范
        return new Docket(DocumentationType.SWAGGER_2)
                //apiInfo: 添加api详情信息,参数为ApiInfo类型的参数,这个参数包含了第二部分的所有信息比如标题、描述、版本之类的,开发中一般都会自定义这些信息
                .apiInfo(apiInfo())
                .groupName("tempGroup01") // 分组名称
                //配置是否启用Swagger,如果是false,在浏览器将无法访问,默认是true
                .enable(true)
                .select()
                //apis: 添加过滤条件,
                .apis(RequestHandlerSelectors.basePackage("com.example.controller"))
                //paths: 这里是控制哪些路径的api会被显示出来,比如下方的参数就是除了 /user/* 以外的其它路径都会生成api文档
                .paths((String a) -> !a.startsWith("/user") )
                .build();
    }

    private ApiInfo apiInfo(){
        Contact contact = new Contact("名字:name", "个人链接:http://xxx.xxx.com/", "邮箱:XXX");
        return new ApiInfo(
                      "标题内容", // 标题
                      "描述内容", // 描述
                      "版本内容:v1.0", // 版本
                      "链接:http://xxx.xxx.com/", // 组织链接
                       contact, // 联系人信息
                      "许可:Apache 2.0 许可证", // 许可
                      "许可链接:XXX", // 许可连接
                      new ArrayList<>()// 扩展
        );
    }
}
如果要配置多个分组只需要配置多个 docket 即可
@Bean
public Docket docket1(){
   return new Docket(DocumentationType.SWAGGER_2)
      .groupName("组一")
      // 省略配置....
}
@Bean
public Docket docket2(){
   return new Docket(DocumentationType.SWAGGER_2)
     .groupName("组二")
     // 省略配置....
}
@Bean
public Docket docket3(){
   return new Docket(DocumentationType.SWAGGER_2)
     .groupName("组三")
     // 省略配置....
}
Entity 的模板
参考资料 swagger2 注解说明
@ApiModel(description = "用户登录")
public class UserLoginVO implements Serializable {

    private static final long serialVersionUID = 1L;

    @ApiModelProperty(value = "用户名",required=true)
    private String username;

    @ApiModelProperty(value = "密码",required=true)
    private String password;

    // getter/setter省略
}
@Api(tags="用户模块")
@Controller
public class UserController {

    @ApiOperation(value = "用户登录", notes = "")
    @PostMapping(value = "/login")
    public R login(@RequestBody UserLoginVO userLoginVO) {
        User user=userSerivce.login(userLoginVO);
        return R.okData(user);
    }
}
Controller 模板
参考资料 swagger2 注解说明
@Api(tags="用户管理")
@RestController
@RequestMapping("/user")
public class UserController {

    @ApiOperation(value="用户登录",notes="随边说点啥")
    @ApiImplicitParams({
        @ApiImplicitParam(name="mobile",value="手机号",required=true,paramType="form"),
        @ApiImplicitParam(name="password",value="密码",required=true,paramType="form"),
        @ApiImplicitParam(name="age",value="年龄",required=true,paramType="form",dataType="Integer")
    })
    @PostMapping("/login")
    public JsonResult login(@RequestParam String mobile, @RequestParam String password,
    @RequestParam Integer age){
        //...
        return JsonResult.ok(map);
    }

    @ApiOperation("获取用户信息")
    @ApiImplicitParams({
        @ApiImplicitParam(paramType="query", name="userId", dataType="String", required=true, value="用户Id")
    })
    @ApiResponses({
        @ApiResponse(code = 200, message = "请求成功"),
        @ApiResponse(code = 400, message = "请求参数没填好"),
        @ApiResponse(code = 404, message = "请求路径没有或页面跳转路径不对")
    })
    @ResponseBody
    @RequestMapping("/list")
    public JsonResult list(@RequestParam String userId) {
        ...
        return JsonResult.ok().put("page", pageUtil);
    }

    @ApiOperation("创建用户")
    @PostMapping("/users")
    public User create(@RequestBody @Valid User user) {
        return user;
    }

    @ApiOperation("用户详情")
    @GetMapping("/users/{id}")
    public User findById(@PathVariable Long id) {
        return new User("bbb", 21, "上海", "aaa@bbb.com");
    }

    @ApiOperation("用户列表")
    @GetMapping("/users")
    public List<User> list(@ApiParam("查看第几页") @RequestParam int pageIndex,
                           @ApiParam("每页多少条") @RequestParam int pageSize) {
        List<User> result = new ArrayList<>();
        result.add(new User("aaa", 50, "北京", "aaa@ccc.com"));
        result.add(new User("bbb", 21, "广州", "aaa@ddd.com"));
        return result;
    }

    @ApiIgnore
    @DeleteMapping("/users/{id}")
    public String deleteById(@PathVariable Long id) {
        return "delete user : " + id;
    }

}

@Data
@NoArgsConstructor
@AllArgsConstructor
@ApiModel("用户基本信息")
public class User {

    @ApiModelProperty("姓名")
    @Size(max = 20)
    private String name;
    @ApiModelProperty("年龄")
    @Max(150)
    @Min(1)
    private Integer age;
    @NotNull
    private String address;
    @Pattern(regexp = "^[a-zA-Z0-9_-]+@[a-zA-Z0-9_-]+(\\.[a-zA-Z0-9_-]+)+$")
    private String email;

}
生成离线文档
这里使用 Swagger 的增强工具 knife4j
生产环境也要停用
springfox:
  documentation:
    enabled: false

knife4j:
  enable: true #停用Swagger文档
Knife4j 本身已经引入了 springfox,开发者在使用时不用再单独引入Springfox的具体版本
<dependency>
    <groupId>com.github.xiaoymin</groupId>
    <artifactId>knife4j-spring-boot-starter</artifactId>
    <!--在引用时请在maven中央仓库搜索3.X最新版本号-->
    <version>3.0.2</version>
</dependency>
增加一个 @EnableKnife4j 注解,该注解可以开启 knife4j 的增强功能
@SpringBootApplication
@EnableKnife4j
@EnableOpenApi
public class StudyswaggerApplication {
    public static void main(String[] args) {
        SpringApplication.run(StudyswaggerApplication.class, args);
    }
}
然后就能访问
http://localhost:8080/doc.html#/home